
Newbies guide to fan dubbing part one- Preparing a clip!
by Azure
Preparing Video in virtual dub
It's likely that a lot of the time you'll have to make your own clips
from full episodes. Premier can do this but virtual dub is much quicker
and user friendly. Here I'll demonstrate how to prepare a clip to fan
dub.
For this tutorial you'll need Virtual Dub and DIVX 5.02 or later.
Step One- selecting your clip
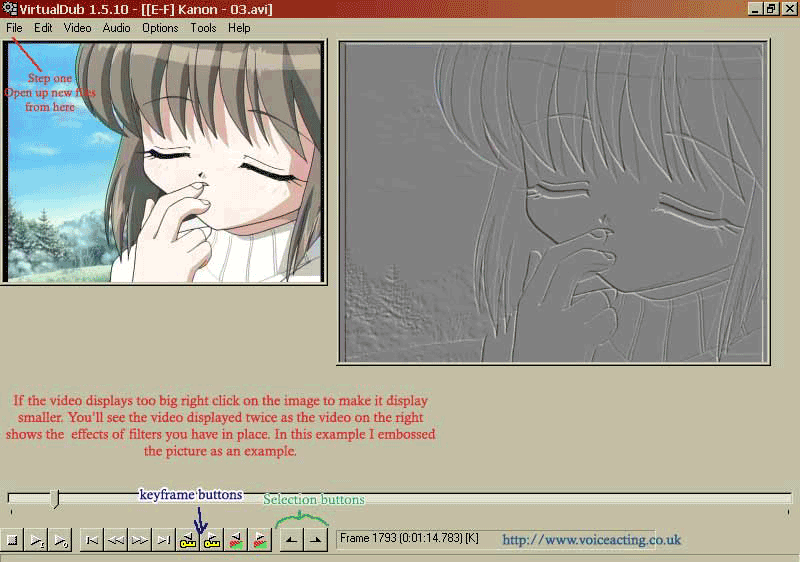
^Click to enlarge picture
- First we open up our episode from the hard drive. If its a large display size then you'll want to change the size it's displayed by right clicking on the video.
- The easiest way to find the clip you want is to use the key frame buttons. These jump you thorough the animation to key frames which show important stages of the animation.You can then use the slider if you want to get more precise.
- Use the selection buttons to mark out the clip. The one of the left indicates the start and the one on the right the end. Using the key frame keys you find the place you want to mark and then press. If done correctly you'll see a blue band appear in the slider marking your selection.
Step Two - Getting that file size down!
- If at the end you find the file is still too big then you can allways resize the vidoe file. Go to Filters> resize .
- This is useful for short clips or files that aren't designed to play full screen.
Step Three -Formatting and compressing using DIVX
- Uncompressed AVIS are HUGE! Think of compression as packing your suitcase properly there are different methods which save different amount of space. When you fold and pack with thought you can get more in!
- First we'll compress the video into DIVX 5. Even if your source is in DIVX we have to tell Virtual dub to save the clip as such. Un compress AVI files are HUGE. There are other types of compression but we're using DIVX for now since most programs will use it.
- Go to Video> Compression>DIVX
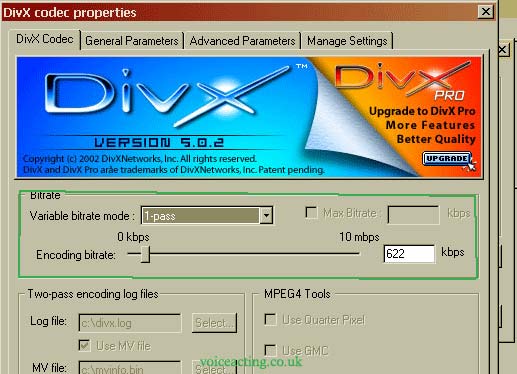
Click image to enlarge
- The part I've circled in Green is the important bit we'll leave the drop down bit and concentrate on the slider. The further right it is the higher the quality but the BIGGER the file space. Just for a test we'll set it at 80kps. (that's very low aim for around 200 for the web it'll make it bigger but it should be watchable)
- Next we need to sort out the sound. If you are planning to export the file to another programmed to be dubbed then simply click Audio>No Audio . This will save you lots of space there's no point having sound if you are going to dub over it is there?!
- Just in case you are using this tutorial to prepare a finished dub or a reference file for cast I'll go into compressing sound.
- First go to Audio>Full Processing mode
- Then go to Audio>Compression
- You'll see various ways if shrinking the size of the audio. Here we'll use MP3. So Select MPEG Layer-3
- Then you'll see a second list appear to the right of the setting it'll tell you how much space it will take up per second of video. The higher the number in general the higher the quality. Usually you don't need stereo so you'll need to select from the mono options. Again it's a case of balancing quality with file size. For now let's select 32 Kbit/s,24,000 Mono
Saving
- Go to file>Save as Avi then type a sensible file name in!
- Click Save , You'll then be shown a menu showing how long it's taking to save and how big the computer estimates it will be. If it's taking a while then use the drop down menu marked "Processing thread priority" and select highest.
Ta da!!!